


Ten poradnik pokazuje krok po kroku jak zsyntetyzować editorial campaign onbrand w popołudnie. Trzy inputy: modelka, moodboard, ciuchy. Jeden prompt łączy je w editorial frame który wygląda jak twój brand, nie jak tanie AI.
Co potrzebujesz
Cztery rzeczy. Bez setupu:
- Platforma z dostępem do GPT Image 2 lub Gemini 3 Pro Image (np. DFirst)
- Zdjęcie modelki (twoja, AI-generated z innej platformy, ze stocku)
- Moodboard (Pinterest, Cosmos, własne)
- Flat lay twoich ciuchów na białym tle (mam bonus prompt jak nie masz)
System w skrócie
KROK 1: Character sheet modelki   (input #1)
KROK 2: Moodboard                  (input #2)
KROK 3: Ciuchy na białym tle       (input #3)
KROK 4: Generacja kampanii         (3 inputy → 1 prompt → 20 frames)

OUTPUT: editorial kampania onbrand
Każdy z pierwszych 3 kroków to przygotowanie jednej rzeczy. Krok 4 to robota: bierze wszystkie 3 razem i syntezuje editorial campaign frame.
Pracuję z brandami które miesiącami umawiały photoshooty żeby dostać 20 zdjęć editorial. Po wdrożeniu tego workflow w studio: jeden setup, jedno popołudnie, pełna kampania spójna z brandem.
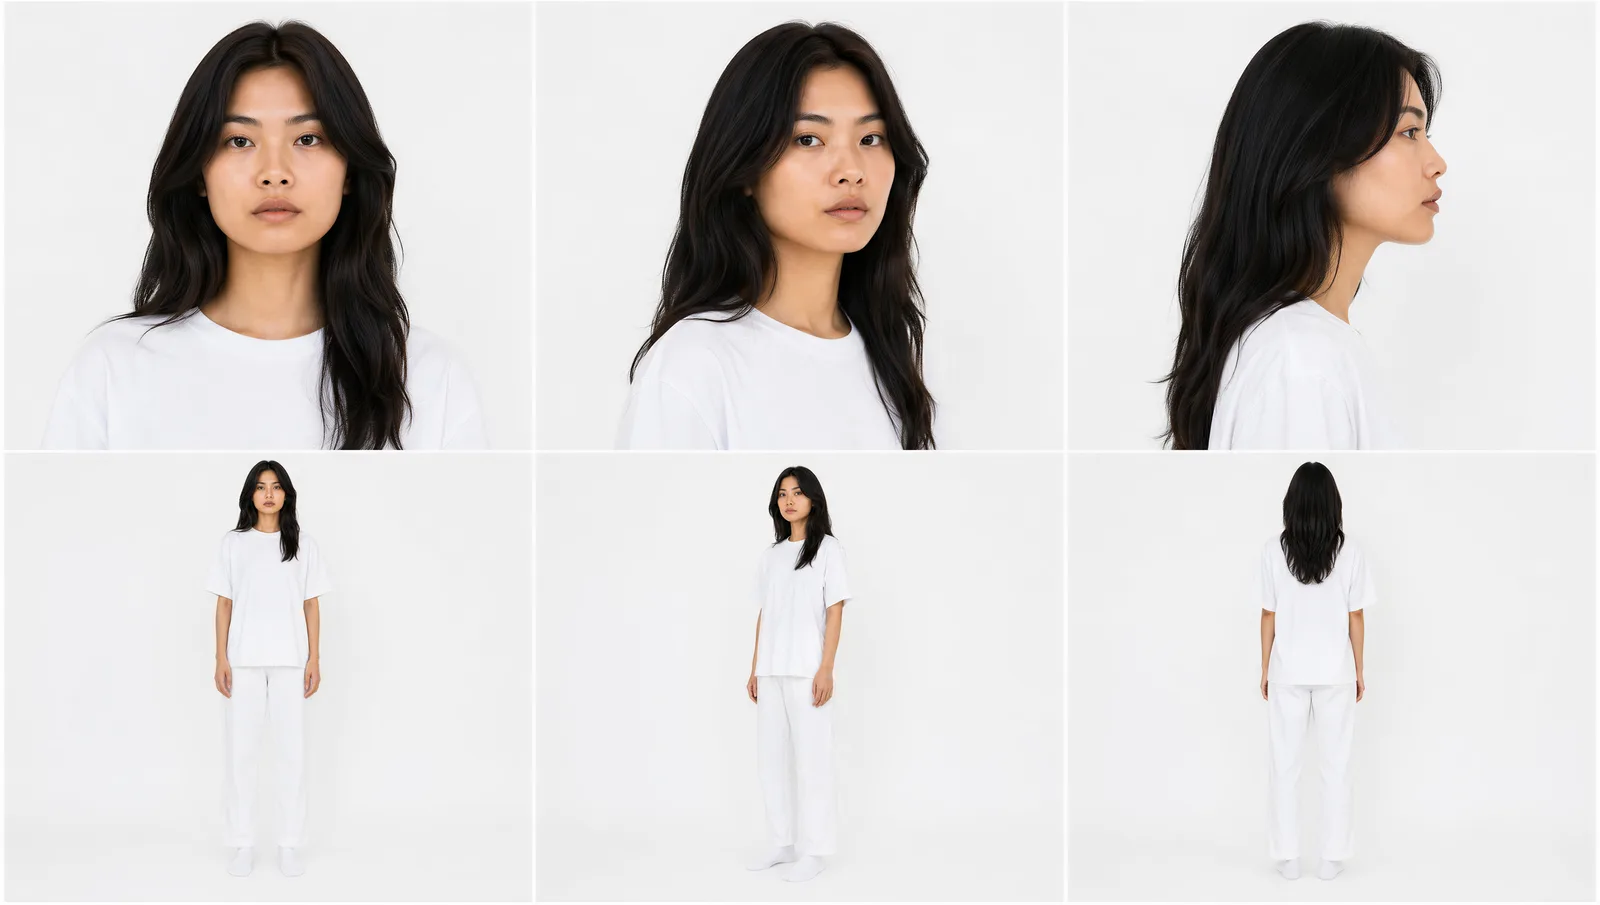
Krok 1: Character Sheet Modelki
Co robi ten prompt
Bierze JEDNO zdjęcie modelki i generuje 6-panelowy character sheet (3 ujęcia twarzy + 3 sylwetka) na białym studio z białymi basicami. To staje się twoim master reference modelki dla całej kampanii. Robisz raz, używasz forever.
- Narzędzie: GPT Image 2 (przez DFirst) lub Gemini 3 Pro Image
- Wrzucasz: zdjęcie modelki (1 photo)
- Wklejasz: Prompt 1 poniżej
- Dostajesz: 6-panelowy character sheet z modelką w białych basicach

Prompt 1 (paste-ready):
ROLE: Act as a top-agency casting director producing a digital comp card. Output is a model identity reference document that will be used as the master casting reference for every subsequent campaign generation with this model. Therefore: maximum fidelity, zero stylization, zero AI idealization.

REFERENCE IMAGE: [upload model photo]

PHASE 1 - IDENTITY FORENSICS (internal analysis, do not output text)

Study the reference with forensic precision. Lock the following non-negotiable identity markers before generating any panel:

- Bone structure: cheekbone height, jaw shape, brow ridge, chin point
- Eye shape: monolid/double-lid, almond/round, set width, iris color, lash density
- Nose: bridge height, tip shape, nostril width, profile angle
- Lip shape: upper curve, lower volume, philtrum length, mouth width
- Skin: texture, tone, undertone, freckles, moles, scars, characteristic asymmetries
- Hair: exact color (note natural variation), texture density (straight/wavy/coily), length, hairline shape, natural parting
- Ears: shape, size, position, lobe attachment
- Body: height impression, build, shoulder width, torso-to-leg ratio, hand size, posture
- Age signals: skin elasticity, hair maturity, posture characteristics

Every panel in Phase 2 must show the SAME PERSON. If a viewer compared the reference to any panel, they should think "yes, that is them" without hesitation. Identity drift = total failure.

PHASE 2 - COMP CARD GENERATION

Generate a single composite image: 6-panel character sheet, 2 rows by 3 columns, 3:2 aspect ratio per panel, equal panel sizes.

UNIVERSAL STYLING (every panel, no variation):

- Top: plain white heavyweight cotton crew-neck t-shirt, slightly oversized relaxed fit, soft natural drape, visible cotton weave texture, no logo, no graphics, no print
- Bottom: plain white cotton straight-cut trousers, relaxed fit, ankle length, no pleats, soft cotton twill, no visible branding
- Feet: plain white cotton socks, no shoes
- Hair: styled exactly as reference, no restyling, no smoothing
- Skin: as reference, no makeup beyond what reference shows
- No accessories, no jewelry, no watch, no glasses (unless integral to reference identity)

UNIVERSAL LIGHTING (every panel, no variation):

- Two-source studio softbox setup: large softbox front-fill at 45 degrees camera left, secondary softbox at 90 degrees camera right for fill
- Color temperature 5500K neutral daylight, no warm or cool grading
- Even illumination across face and body, key-to-fill ratio low (1.5:1)
- Twin softbox catchlights visible in eyes
- No rim light, no hair light, no theatrical effects, no atmospheric haze

UNIVERSAL BACKGROUND (every panel, no variation):

- Pure neutral seamless paper backdrop, off-white #F8F8F6
- No texture, no gradient, no color cast
- Subject casts soft natural ground shadow, never sharp
- Zero environmental detail, zero props, zero furniture

6 PANEL LAYOUT:

Row 1 (face row, head and shoulders crop):

Panel 1 - Front face: subject faces camera directly, eyes to lens, neutral alert expression. 85mm f/2.8.

Panel 2 - Three-quarter face: body rotated 30 degrees from camera, head turned back to camera. Same crop, lens, expression.

Panel 3 - Profile face: body and head rotated 90 degrees, full side profile. Eyes looking forward (not at camera).

Row 2 (body row, full body head to feet):

Panel 4 - Front body: subject standing relaxed, arms loose at sides, weight evenly distributed, neutral stance, faces camera, neutral expression. 35mm f/5.6.

Panel 5 - Three-quarter body: body rotated 30 degrees from camera. Same neutral stance, lens, expression.

Panel 6 - Back body: subject facing away, full back visible, same neutral stance.

CROSS-PANEL CONSISTENCY (NON-NEGOTIABLE):

- Same person in every panel: bone structure, hair, skin, body identical
- Same outfit in every panel: same shirt drape, same trouser cut, same socks
- Same lighting in every panel: softbox positions identical
- Same expression baseline: neutral alert, mouth closed naturally, eyes engaged but not posed
- Same skin texture rendering: no smoothing in some panels and texture in others

ANTI-PATTERNS (EXPLICIT REJECTION):

- No idealization of face. Preserve asymmetries, blemishes, natural imperfections exactly as reference
- No "beauty editorial" skin smoothing. Pores visible, texture intact
- No symmetrization if reference is asymmetric
- No "model agency pretty pose". Relaxed neutral standing only
- No smiling at camera unless reference subject is smiling
- No theatrical lighting, no dramatic shadows, no rim lights, no colored gels
- No environmental atmosphere in background. Pure seamless studio paper only
- No outfit variation between panels. Same shirt and trousers throughout
- No "AI fashion model" face proportions. Preserve reference exactly
- No softening of ethnic features toward generic. Preserve identity precisely
- No age idealization. Preserve age signals (skin maturity, gray hairs, lines) as reference shows

CULTURAL FINGERPRINT (the genre, match its conventions):

- Models.com new face polaroid book aesthetic
- Storm Models / IMG Models / Elite Models digital comp card industry standard
- Helmut Lang archive test shoot polaroids
- Margiela basic series casting reference
- Industry casting director's working document. NOT editorial campaign, NOT fashion magazine

OUTPUT SPECS:

- Single composite image, 6-panel grid, 2 rows by 3 columns
- 16:9 overall aspect ratio
- 4K resolution
- Sharp detail in every panel
- All panels mutually consistent (same person, outfit, lighting, background)

QUALITY GATE:

- Same person recognizable across all 6 panels
- Zero outfit variation
- Zero lighting variation
- Skin texture preserved, not smoothed
- Asymmetries preserved, not corrected

If any gate fails, regenerate. This sheet's quality determines the quality of every future generation.
Wrzuć zdjęcie modelki, wklej prompt, generate. Output: master identity reference do całej kampanii.
Tip: jak modelka driftuje na panelach (jeden panel wygląda jak inna osoba), regeneruj. Bez sharp identity lock w Kroku 1, kolejne kroki będą się sypać.
Nie masz modelki? Wygeneruj ją w GPT Image 2 lub Gemini 3 Pro Image (np. "fashion model portrait, [opis], on white background, editorial photography"). Potem użyj wygenerowanego zdjęcia jako input do Kroku 1.
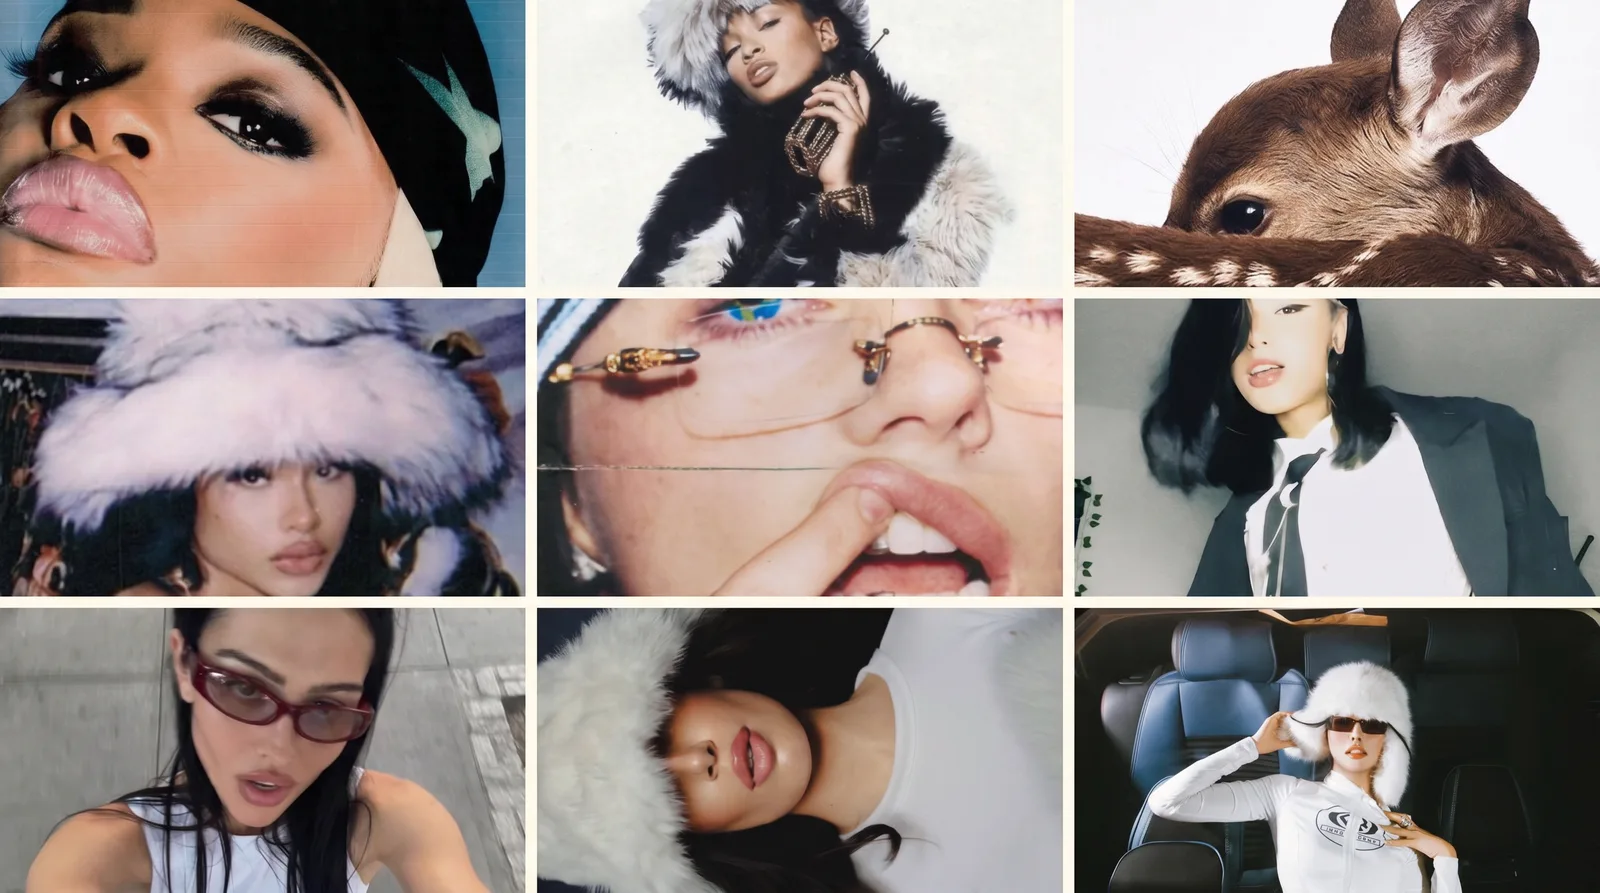
Krok 2: Moodboard
Po co ci moodboard
Moodboard to TWÓJ visual world. Kolory, światło, atmosfera, kultury, references. To z niego AI ekstraktuje DNA i aplikuje do kampanii. Bez dobrego moodboardu output będzie wyglądał jak generic AI.
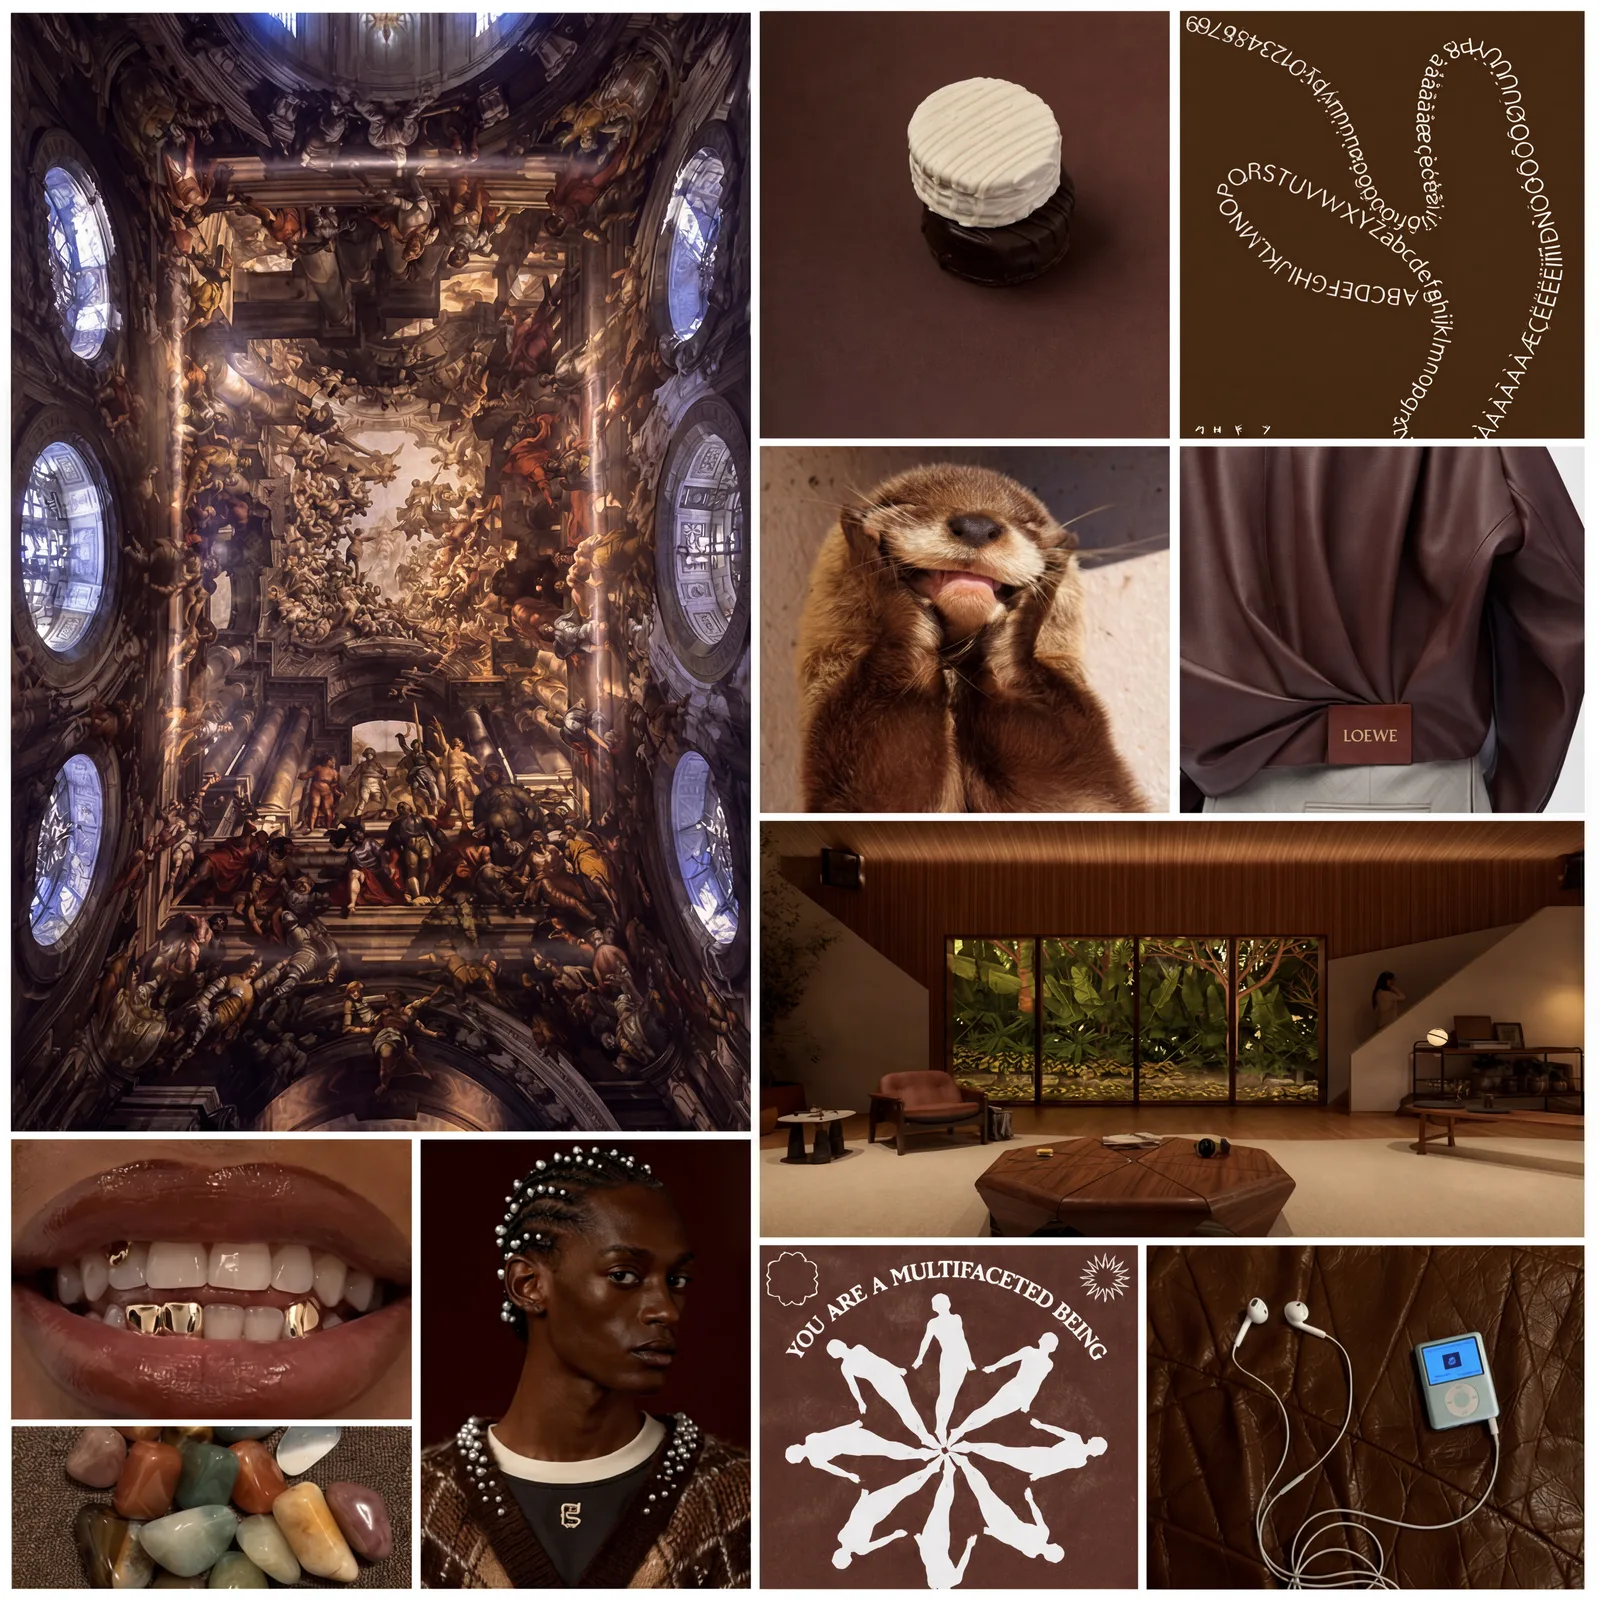
Jak zrobić moodboard
Zbierz 8–12 zdjęć referencyjnych z Pinterest, Cosmos, Are.na albo własnych. Wrzuć do dowolnego programu graficznego (Figma, Photoshop, Canva, Pinterest collage maker), ułóż w siatkę, zapisz jako jedno PNG/JPG.
Możesz też wrzucić te zdjęcia do generatora AI (GPT Image 2 albo Nano Banana Pro od Google) i poprosić żeby złożył moodboard za Ciebie. Gotowy prompt do tego masz w moim poradniku Brand Identity w 30 minut (sekcja Krok 2: Moodboard z prompta).
Tip: im wyższa jakość zapisu, tym lepiej. AI musi widzieć detale w referencyjnych zdjęciach żeby wyciągnąć z nich DNA.
Opcja C: Pojedyncze zdjęcie referencyjne
Jak masz jedno mocne zdjęcie które idealnie reprezentuje vibe, możesz użyć go solo. Mniej referencji = AI ma mniej z czego wybierać, ale działa.
Co dobry moodboard powinien mieć
- 8-12 zdjęć (mniej = AI nie ma vocabulary, więcej = noise)
- Spójny vibe (kolory, światło, era, mood, wszystkie zdjęcia pasują do siebie)
- Specyficzny kierunek (np. "1996 Helmut Lang archive" > "minimalism")
- Mix environmentów, textur, light situations, color stories
Krok 3: Ciuchy (flat lay)
Co potrzebujesz
Najlepiej: flat lay twoich ciuchów na białym tle. Każdy garment widoczny, kolory i patterny wyraźne.
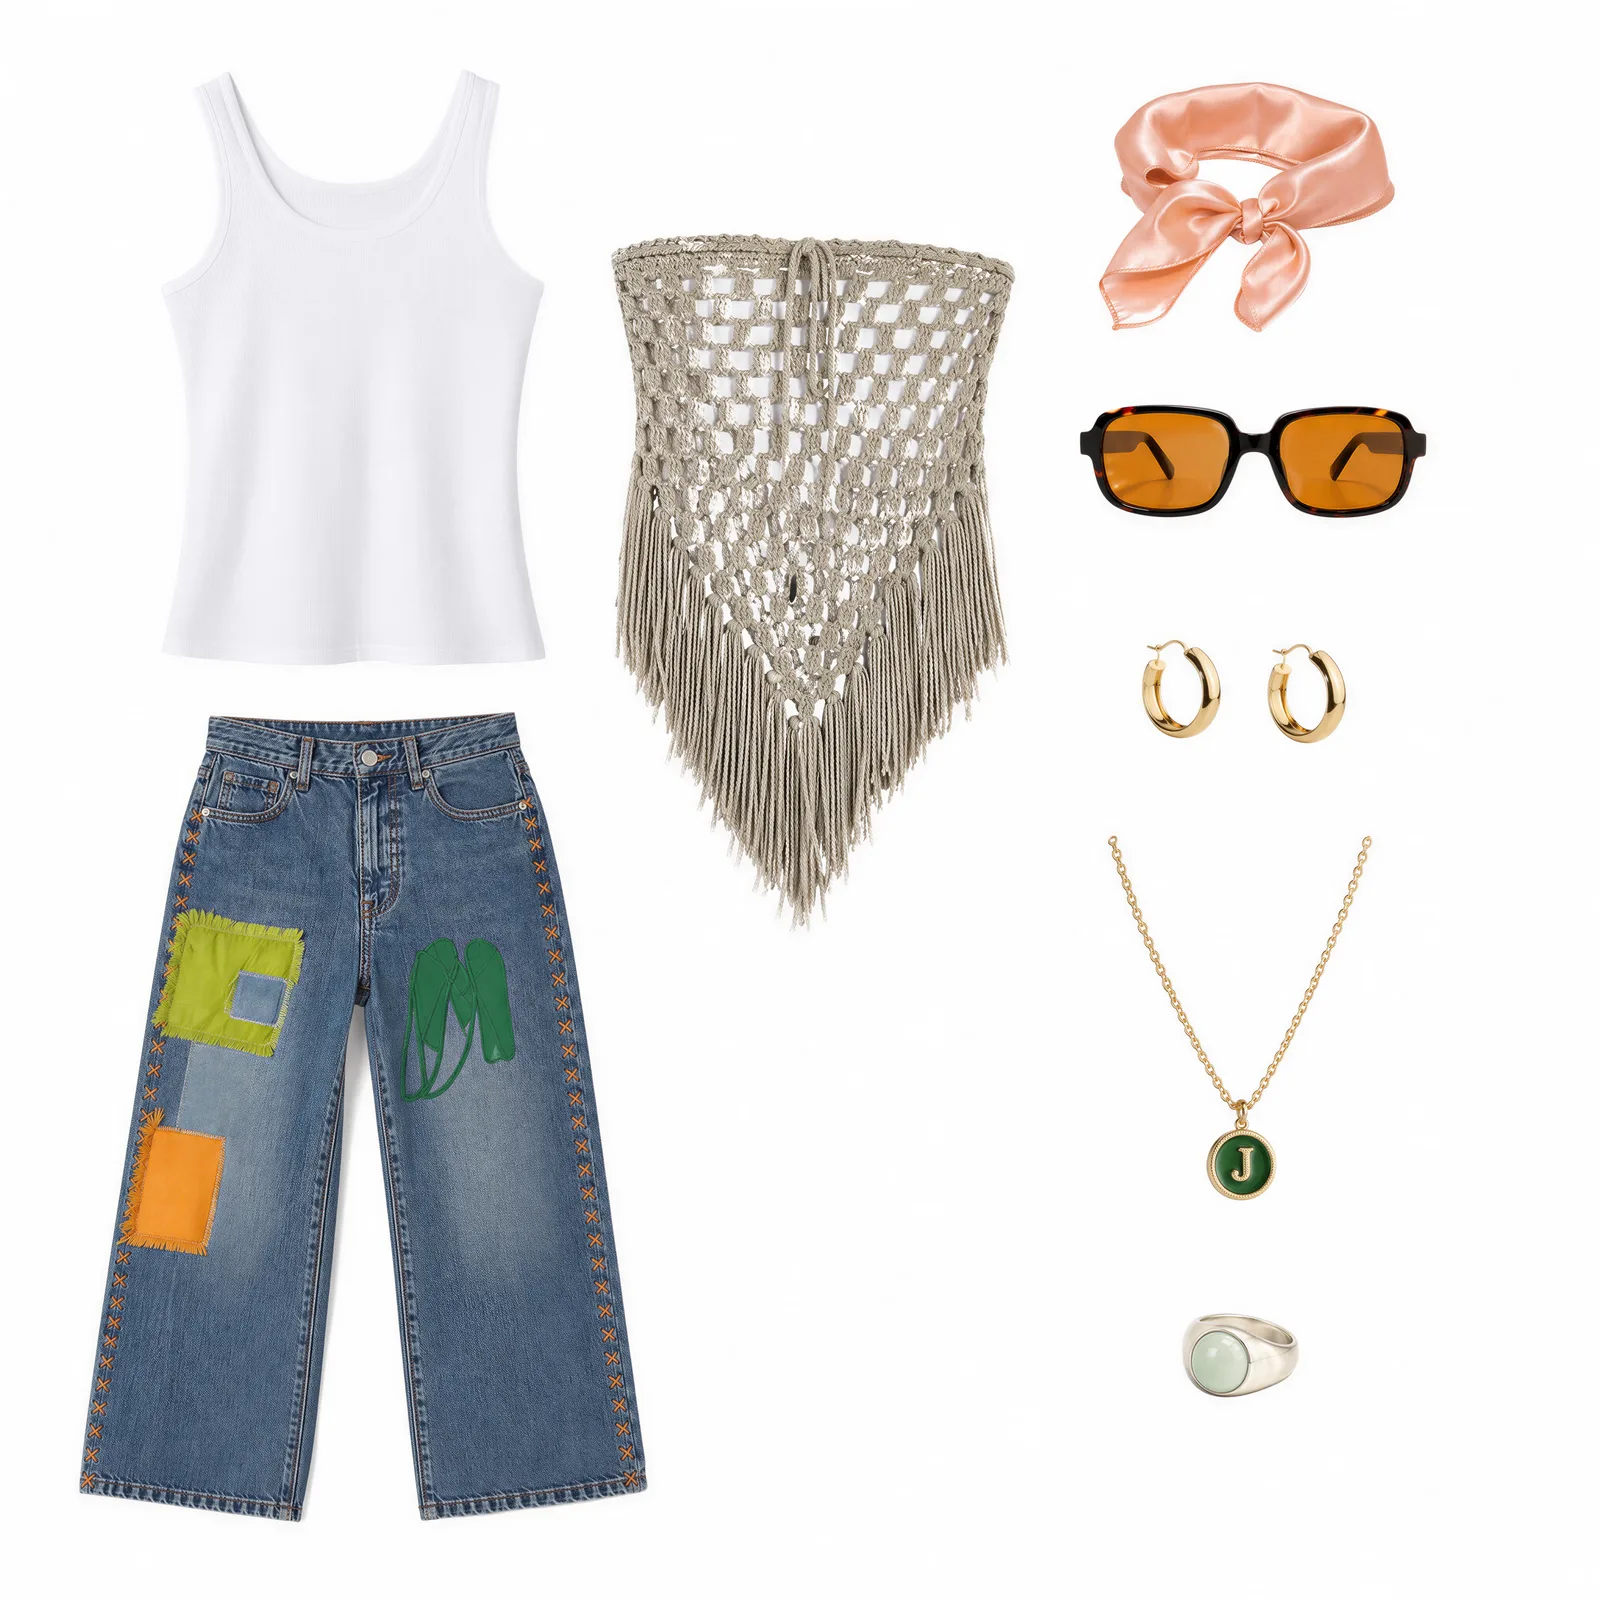
3 ścieżki w zależności co masz
Ścieżka A: Mam czysty flat lay
Idealne. Idź do Kroku 4.
Ścieżka B: Mam kilka osobnych flat layów
Zbierz wszystkie flat lay zdjęcia, wrzuć do programu graficznego (Figma, Photoshop), ułóż w jeden obraz na białym tle, zapisz jako PNG. Tego użyjesz jako Input #3.
Ścieżka C: Ciuchy są na racku, na modelce, w lookbooku
Użyj bonus prompta poniżej żeby wyizolować je na białe tło.
Bonus Prompt - Garment Isolation (paste-ready):
Isolate the clothing items in this image as individual clothing pieces on a white background. Include accessories but exclude clothing rack if present.
- Narzędzie: GPT Image 2 lub Nano Banana Pro
- Wrzucasz: zdjęcie z ciuchami (rack, modelka, lookbook)
- Wklejasz: prompt powyżej
- Dostajesz: każdy garment osobno na białym tle. Tego użyjesz jako Input #3 w Kroku 4.
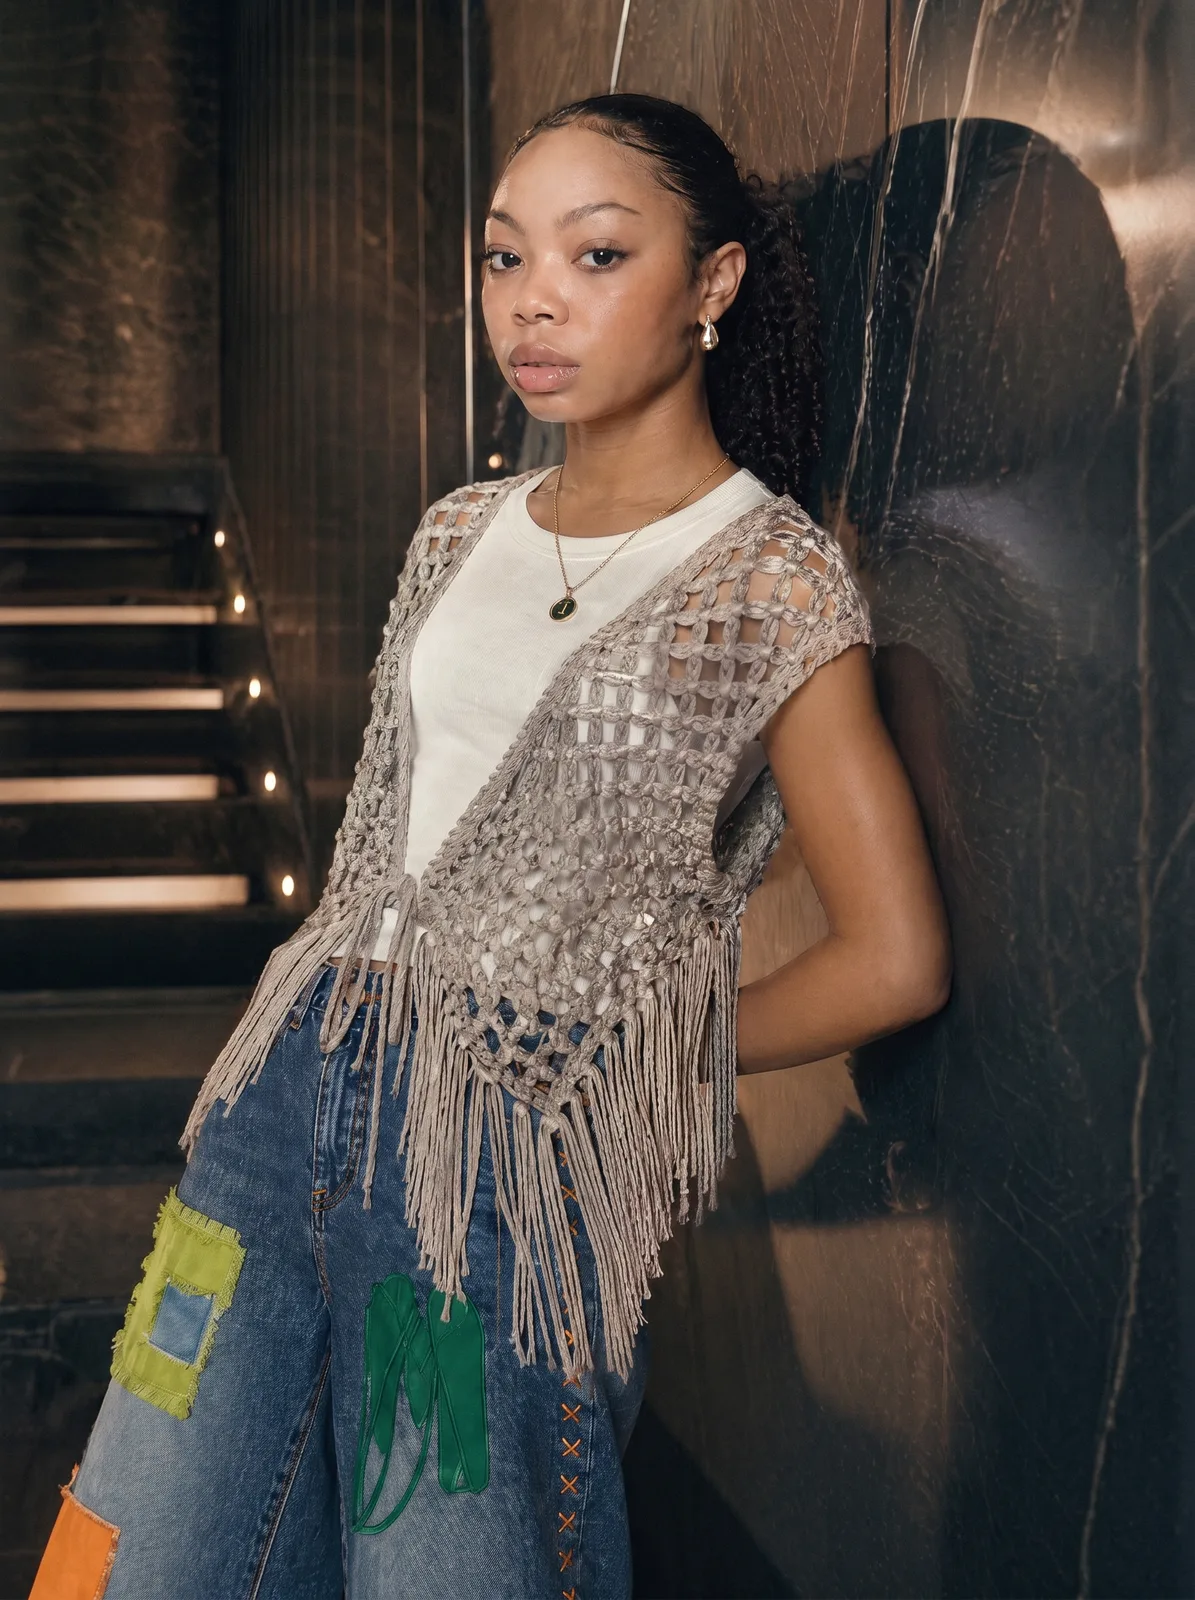
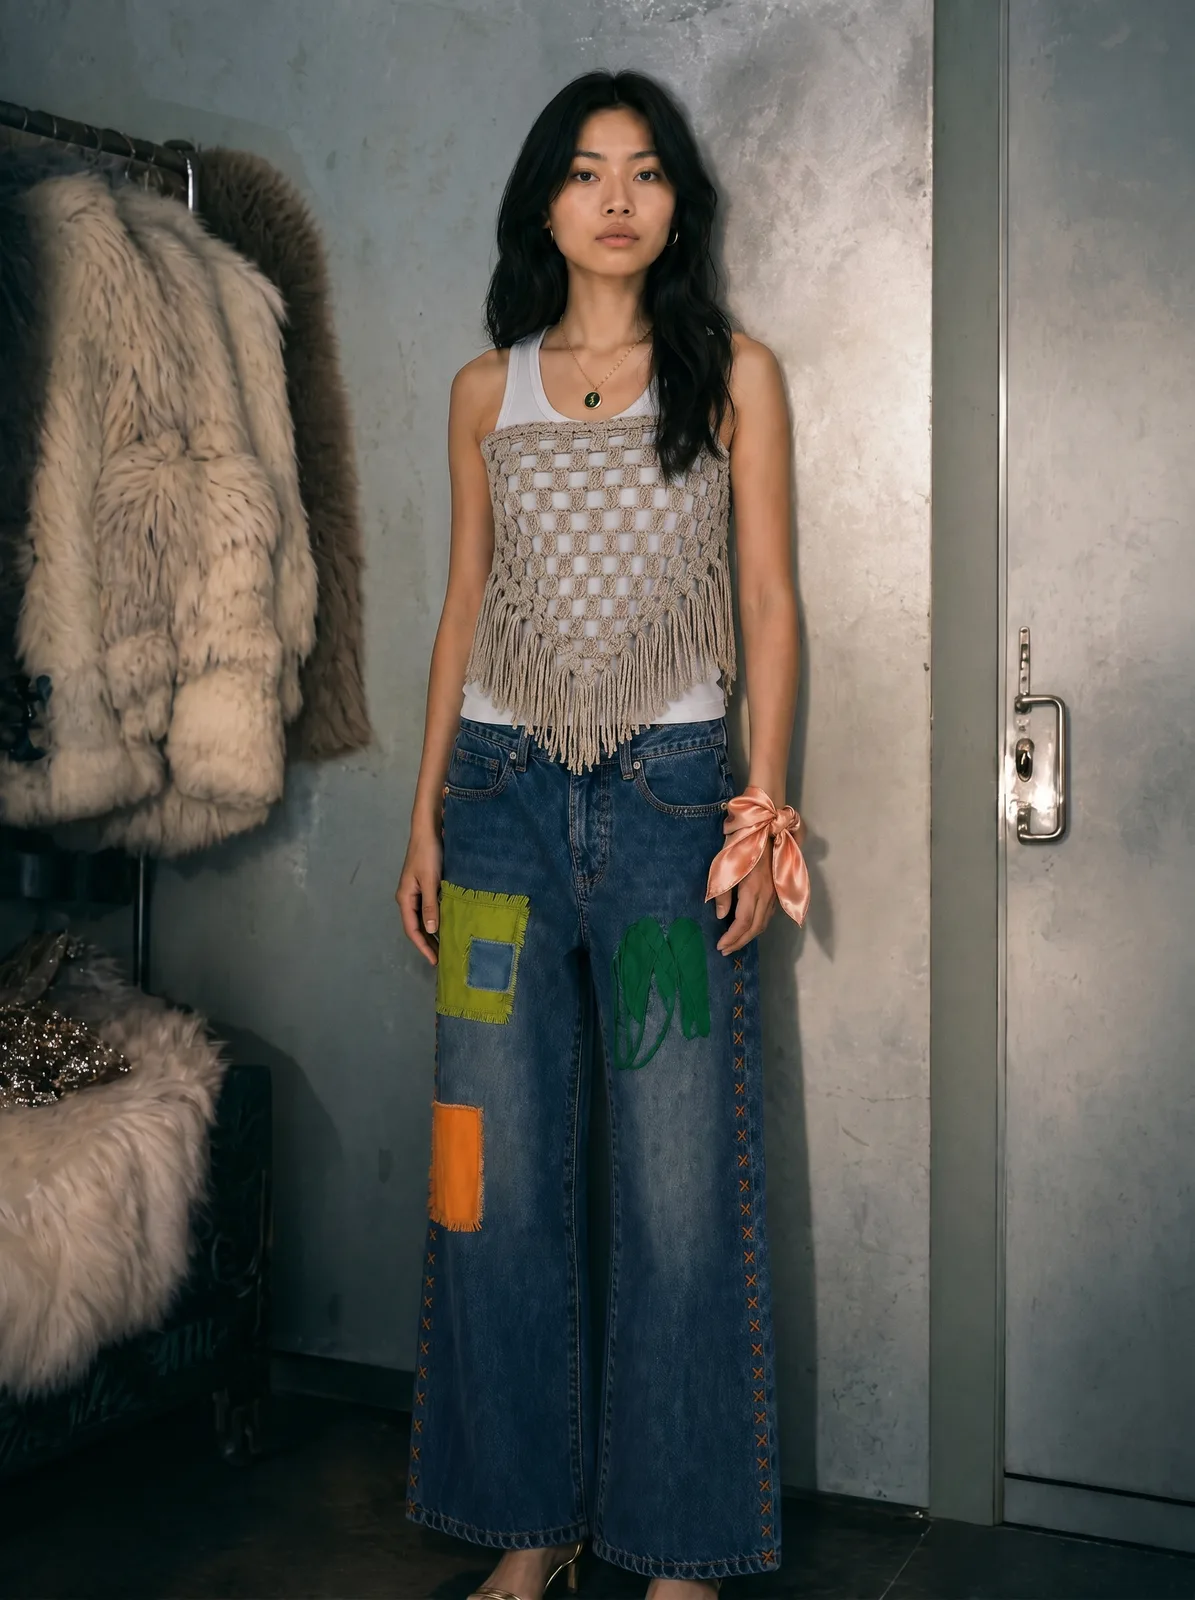
Krok 4: Generacja Editorial Campaign
Co robi ten prompt
Tu się składa wszystko. Bierze 3 rzeczy razem: character sheet modelki + moodboard + flat lay ciuchów. AI forensycznie ekstraktuje DNA moodboardu (kolory, światło, atmosferę, kulturowy register, mood) i syntezuje editorial campaign frame z TWOJĄ modelką w TWOICH ciuchach, w nowym środowisku zaprojektowanym z TWOJEGO moodboardu.
Wynik: editorial campaign frame onbrand. Powtarzasz 20-25 razy z różnymi modyfikatorami z menu na końcu prompta = pełna kampania 20 zdjęć.
- Narzędzie: GPT Image 2 (przez DFirst) lub Gemini 3 Pro Image
- Wrzucasz:
- IMAGE 1: Moodboard (z Kroku 2)
- IMAGE 2: Character sheet modelki (z Kroku 1)
- IMAGE 3: Flat lay ciuchów (z Kroku 3)
- Wklejasz: Prompt 2 poniżej + 1 modyfikator z każdej osi (na końcu prompta jest menu)
- Dostajesz: 1 editorial campaign frame onbrand. Powtarzasz z różnymi modyfikatorami = 20 frames.
Prompt 2 (paste-ready):
ROLE: Senior fashion campaign photographer and creative director synthesizing a single final campaign image from three locked references.

INPUTS:

- IMAGE 1 = MOODBOARD (visual world: multiple frames depicting atmosphere, lighting, color, materiality, mood)
- IMAGE 2 = MODEL CHARACTER SHEET (locked identity: face, body, baseline)
- IMAGE 3 = OUTFIT (locked styling: exact garments, colors, materials, branding)

OBJECTIVE: Generate one editorial campaign photograph where the model from IMAGE 2 wears the outfit from IMAGE 3 inside an environment SYNTHESIZED from IMAGE 1's unified visual logic. The output must read as a single frame from a campaign whose visual world IS the moodboard.

PHASE 1 - MOODBOARD FORENSICS (internal analysis, do not output text)

The moodboard is visual VOCABULARY, not visual COPY. Your task is to write a new sentence using this vocabulary, never to replicate any of its examples.

Execute 6 internal passes:

PASS 1 - DEFOCUS

Squint at the moodboard until individual frames dissolve into shapes, tones, and light. What survives across 4 or more frames? That residue is the unified logic. Anything in fewer than 4 frames is noise. Discard.

PASS 2 - ENVIRONMENT VOCABULARY

What kinds of spaces recur? Interior or exterior? Architectural language? Materials (concrete, wood, fabric, glass, metal, vegetation, water)? Scale (intimate / expansive / compressed / vertical / horizontal)? Era and cultural register? Geographic context? Note the recurring environmental qualities, NOT specific locations.

PASS 3 - LIGHTING LOGIC

Source type (natural / practical / motivated artificial)? Direction (overhead / side / back / ambient)? Quality (hard / soft / wrap / diffused)? Time-of-day implication? Color temperature range? Shadow density and edge quality? Atmospheric devices (haze / dust / clean / volumetric)? Extract the recipe, not the dish.

PASS 4 - COLOR GRADING

Dominant tonal family? Accent tones? Saturation strategy (where saturated, where muted, why)? Contrast philosophy (high / low / selective)? Highlight color cast and shadow color cast? Color relationships (analogous / complementary / split / monochromatic)? This is the master color recipe applied across the entire output.

PASS 5 - COMPOSITION TENDENCIES

Framing tightness recurring? Subject placement patterns? Negative space ratio? Depth layering strategy? Camera relationship to subject (intimate / observational / detached)? Lens character implied (wide environmental / standard / telephoto isolation)?

PASS 6 - TENSION DETECTION

What productive contradictions coexist in the moodboard (control + grit, intimacy + detachment, warmth + isolation, polish + roughness, stillness + motion)? These tensions are the fingerprint of the moodboard's specific taste. They MUST survive in the output.

PHASE 2 - INPUT FIDELITY LOCKS

IMAGE 2 (MODEL) IDENTITY LOCK:

Bone structure, eye shape, nose, lip shape, skin texture, hair, body type, age signals: preserve EXACTLY as in character sheet. Same person must be recognizable in this output as in IMAGE 2. No idealization, no smoothing, no symmetrization, no "AI fashion model" face proportions.

IMAGE 3 (OUTFIT) STYLING LOCK:

Every garment color, pattern, fabric texture, branding, stitching, proportion preserved 1:1. The outfit drapes naturally on IMAGE 2's body type. No restyling, no recoloring, no logo modification. If outfit colors clash with moodboard palette: OUTFIT COLORS WIN. Moodboard palette applies to environment only.

PHASE 3 - ENVIRONMENT SYNTHESIS (CRITICAL, read twice)

Your job is NOT to find the closest matching frame in the moodboard and place the model there. Your job is to GENERATE A NEW ENVIRONMENT that did not appear in the moodboard but obeys all the vocabulary extracted in Phase 1.

If the moodboard contains a beach + a bedroom + a cafe, do NOT generate beach / bedroom / cafe. Generate a DIFFERENT environment, maybe a hallway, courtyard, hotel lobby, train station, a kitchen, an underpass, a stairwell. Whatever inherits the moodboard's lighting language, color grading, materiality, atmospheric devices, and emotional register.

Self-test before committing: "Could a viewer trace this environment back to a specific moodboard frame?" If yes, change it. The output environment must be NEW but on-vocabulary.

The environment must feel inhabited and real. Photographed-in. Not CGI-rendered, not obviously simulated, not "AI atmospheric".

PHASE 4 - INTEGRATION

LIGHTING INTEGRATION:

The model is lit by the environment's light, not by studio softboxes. Match the lighting direction, color temperature, and shadow density extracted in PASS 3. Catchlights in the eyes correspond to the environment's actual light sources. Shadows on outfit follow the environment's logic. If outfit has a natural color and environment has a cool tonal cast: outfit shows cool environmental light on edges only, outfit core color preserved.

SPATIAL INTEGRATION:

Realistic scale. Model size relative to environment elements is photographically plausible. Ground contact with visible weight and soft natural shadow under feet, no floating. Atmospheric perspective. Distant environment elements show appropriate haze and falloff. Eye line is justified. If the model looks at camera, the moodboard must support a direct portrait beat. Otherwise give them a believable eye target inside the environment.

PHOTOGRAPHIC MATCH:

Lens character matches PASS 5 extraction (wide environmental vs telephoto isolation). Grain, film texture, or digital noise level matches the moodboard. Color grading recipe from PASS 4 applied to the entire frame including model and outfit. Compression, sharpness, and depth of field match the moodboard's photographic register.

PHASE 5 - TASTE OPTIMIZATION (curatorial layer)

EDITORIAL RESTRAINT:

Do not over-style the environment. Show only what the frame requires. Negative space is power. Let the frame breathe where moodboard suggests stillness. One strong visual idea per frame, not three competing ones.

REFERENCE ECHO:

Every visual choice in the environment must be traceable to moodboard vocabulary. If a choice cannot trace, replace it with one that can. Specificity over generality, always.

ANTI-TEMPLATE BIAS:

Reject Pinterest editorial cliches (single chair in empty room, dramatic curtain, hands pressed on glass, model staring out window). Reject AI editorial defaults (generic moody lighting, golden hour everywhere, stock fashion poses). If a visual choice could appear in any random AI generation, replace it with something specific to this moodboard.

TENSION PRESERVATION:

The productive contradictions detected in PASS 6 must survive in the output. If the moodboard has "intimate + detached" tension, the output must hold both. Total uniformity equals boring. Total chaos equals template fail. Sweet spot equals consistent system with intentional disruption.

DOES IT LOOK EXPENSIVE TEST:

AI slop looks effortless because it IS effortless. Real campaign work looks effortless because the effort is invisible. Aim for the second category.

PHASE 6 - ANTI-PATTERN REJECTION (explicit)

REJECT:

- Composited / cutout artifacts (model and environment look layered, not photographed together)
- Lighting mismatch (model lit by studio light in environment with directional natural light)
- Color contamination (environment color casts onto outfit, distorting outfit colors)
- Static studio pose in environmental context (hand on hip in alleyway is wrong)
- Literal moodboard frame replication (you generated a moodboard reference, not a synthesis)
- Generic AI editorial defaults overriding moodboard specificity (warm haze on everything, smooth skin, golden hour fallback)
- Scale errors (model too large or small relative to environment)
- Smiling at camera unless the moodboard supports it
- Symmetric composition unless the moodboard supports it
- Atmospheric effects added "to feel cinematic" (lens flares, dust particles, god rays where moodboard has none)
- Environment that exists in any moodboard frame literally. Output must be NEW

PHASE 7 - DIRECTION FOR THIS GENERATION

[PASTE ONE COMBINATION FROM EACH AXIS BELOW]

ENVIRONMENT FOCUS:

- Interior intimate (bedroom-scale, single subject focus)
- Interior expansive (lobby / corridor / atrium-scale, environment dominant)
- Exterior intimate (courtyard / alley / threshold, contained)
- Exterior expansive (street / landscape, open)
- Liminal transition (doorway, stairwell, hallway, threshold)

CAMERA RELATIONSHIP:

- Tight portrait (head and shoulders, environment soft / abstract)
- Medium environmental (waist up, environment readable)
- Wide environmental (full body, environment dominant)
- Detail crop (hands / product / fabric inside the environmental atmosphere)

POSE / ACTION:

- Static stillness (subject motionless, environment in motion)
- Walking through (subject mid-stride)
- Seated / leaning (subject in physical contact with environment)
- Turning (subject mid-rotation)
- Looking off (gaze directed into environment, not camera)

LIGHTING TIME:

Within moodboard's temporal range only. Pick the time of day implied by the moodboard, do not invent outside it.

PHASE 8 - OUTPUT SPECS

- Single image, aspect ratio 4:5 vertical (default for editorial campaign use, override to 3:2 horizontal if environment focus is expansive)
- 4K resolution
- Editorial campaign quality
- Photographically plausible. No AI tells
- This image is one frame in a 20-frame campaign. The next 19 frames will use the same three inputs varied through PHASE 7 menu and must feel like part of the same campaign.
Wrzucasz wszystkie 3 obrazy (moodboard, character sheet, flat lay ciuchów), wklejasz prompt, dopisujesz na dole jeden modifier z każdej osi (np. "Interior expansive + Wide environmental + Walking through"), generate.
Powtarzasz 20-25 razy z różnymi kombinacjami modyfikatorów. Z 25 generacji wybierasz 20 najlepszych. Masz pełną kampanię.
Tip: każda generacja powinna mieć INNĄ kombinację z menu. Nie powtarzaj. 5 środowisk x 4 kamery x 5 póz = 100 unikalnych combos możliwych.
Krok 5: Co dalej ze zdjęciami
Wybierz top zdjęcia z generacji. Kryteria selekcji:
- Identity preserved (modelka recognizable)
- Outfit fidelity 1:1 (kolory, pattern, branding intact)
- Środowisko zsyntezowane z moodboardu, nie kopia jego klatki
- Lighting matchuje moodboard, nie studio
- Wygląda jak photographed, nie composited
Po selekcji:
- Upscale w Topaz Photo AI lub Magnific dla 4K-8K
- Touchup w Photoshop jak coś leci (artefakty na rękach, dziwne tła)
- Color grade spójnie przez wszystkie 20 frames (LUT z najlepszej klatki aplikuj na resztę)
- Crop variants dla różnych formatów (4:5 IG, 1:1 grid, 9:16 reels)
Gdzie używać:
- IG feed (3 tygodnie postów z 20 frames)
- Lookbook PDF dla wholesale i press
- Ecom hero shots (homepage, category pages)
- Ad creatives (Meta, TikTok)
- Email marketing headers
- Pinterest pins
- Newsletter visuals
Co to znaczy za miesiąc
Wyobraź sobie że za miesiąc twój brand ma 200 frames editorial zsyntezowanych z twojego moodboardu. Powtarzalny system. Zero photoshootu. 30 minut setupu i 1 popołudnie produkcji per kampania. Dropy co tydzień, lookbooki na sezon, ad creatives na każdy launch.
To jest poziom output który wcześniej był dostępny tylko brandom z dużym budżetem.